Graphic Students
Last Week: Okay, you guys already know what you need to do, but one thing. ComicLife is a demo version, so when you use it, you have to print when you finish compiling, or it won't save your file unless you pay for it and put in the serial number (by the way we have bought it already, but may not see the serial numbers 'til next semester). So here is the workaround:When ready to print, just go File > Print and in the lower left-hand corner of the print dialog box, choose "save to PDF". This will ensure your final product, and as you will later learn how you are going to submit your project for grading. More later...
Web Students
Last Week: I want you to generate 3 more pages by the end of this week. You are going to create a new theme, or regenerate the one you had if you overwrote it in our experiments. Then, based on that theme, you are going to make a simple photo gallery, with the appropriate pics of your choice. A favorite links page which will contain all the appropriate sites you normally like to visit. Lastly, a short biographical page which will contain your brief background.
The examples follow: - Login, pick a template, and run through the steps of generating one.

- View template in your browser, and copy URL address

- Then in NVU, (if buggy, quit and relaunch) Go to File > Open Web Location..
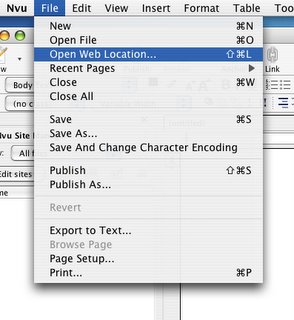
- Then, open the page you generated in Geocties by pasting the URL address from the browser, and then SAVE it to a NEW folder titled "template" within your web page project folder. IMPORTANT: all the images and javascript files will save as well, so make sure you save to its own folder to avoid clutter.

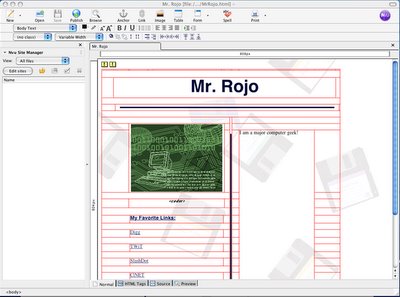
- Your template should look like this in NVU. The red lines represent a table with cells your content is encapsulated in. Basically it gridlock's your text and photos from auto-wrapping if your web site viewer resizes the browser window. You may delete some cells to make the other pages, however if you delete the table, you may get unexpected results.
Comic Strip Project Reminder
Remember:
- You must first do a storyboard in NeoOffice with your pictures and dialogue/captions all planned out. Place it in a simple list order.
- Then make sure all your photos are in your Comic Strip Project folder, and that you are aware that you need to have 3 sets of files. First the original JPGs, then the XCF GimpShop files for editing, then the newly exported JPGs for importing to ComicLife.
- Import them into ComicLife all treated with the Comic Pop-Art tutorial we all went through. Copy and paste your dialogue and captions.
Converting Photos to Comic Art
- Tone: First open up the photo by going to the Gimp toolbar palette, and selecting File > Open and navigate to your folder where your JPEGs are. Then immediately "save a copy as" a GimpShop *.xcf, the native file format for Gimp. After you've saved it to your folder, begin the treatment by duplicating the background layer, and from that layer going to Image > Adjustments > Posterize and choose 6. Then go to Filter > Enhance > Unsharp Mask and apply these settings: Radius 100.0, Amount 1.75, and Threshold 150.
- Color: Duplicate the Background layer again, and drag it to the top of the layer set in the palette. Next, go to Filter > Sharpen > Dilate. Then, go to Image > Adjustments > Hue-Saturation... and select. Leave the Hue at 0, set the Lightness to 50, the Saturation to 80, and click OK. Set it's blending mode to "Color"
- Ink: Again, duplicate the Background layer another time, move it to the top and go to Filter > Artistic > Cartoon and apply 20.00 for the Mask radius & 0.150 for the Percent Black. Next, go to Image > Adjustments > Threshold and set the left slider to 75, and click OK. Then, go to Filter > Artistic > Photocopy and apply these settings. Mask Radius: 50.00, Sharpness: 0.700, Percent black: 0.750, Percent white: 0.200 . Set the blending mode to "Multiply".
- Dot Screen: Create a new blank layer below Ink and label it Dot Screen. Doubble-click the foreground color palette, and change the RGB values to 128, 128, and 128. Then go Edit > Fill with FG Color and it should fill the layer with 50% gray. The go to Filter > Distort > Newsprint and change only, the cell size to 4, and click OK. Now change the Blending Mode to Overlay.
- Optional Tweaks: Now that you have done this tutorial in its entirety, you can optionally paint on color to make sure that parts, like eyes and teeth are white, by creating a blank "White" layer above the Tone layer, and a "Painted Color" layer above the original Color layer, to make sure and see if any other colors need touching up.
- Saving: Save and Export the file in two different formats. One (if you have not already done so) the *.xcf native GimpShop format for further editing and tweaking, and one as a *.jpg for importing into ComicLife.