Monday, July 03, 2006

Summer Session Students

Go to Rojo's Server to see if your Username for the quiz is there, it will be your last name followed by a randomized number.

Then go to QuizStar and test your login.

Monday, April 24, 2006

New Projects

Period 1 - Computer Applications
  • Students will create a revised schedule/calendar of school events with Pages that will show holidays, test dates, student events, and other important information. They will use sound priciples of design, and will make the files availible in PDF and DOC format, testing for errors.
  • They will then design a lunch Menu with Pages that will thematically represent dinning on campus
  • They finally will do a Keynote presentation on what they would change organizationally about the school's bell schedule to improve it, make better use of the time, and keep the student body happy. At the same time, they must provide a solution in preventing fights, truancy, and tardiness. They will tackle issues of whether or not to have an open campus during lunch, etc.
Periods 2 & 3 - Web Design
  • Students will create a simple web site using iWeb with previous work done by students in the first and second semester. They will show a page for the Comic Strip project, and the Recruitment Committee logo.
  • Students will then submit a AppleWorks color palette, topographic map & outline in preparation for a website on their favorite figure(s) or hobby/sport etc. They will then use GoLive to build this site in its entireity with a home page, bio, gallery, FAQs, etc.
  • Finally, students will get into groups of four, and do an audio or video podcast on the subject of their choosing. This must be capped at 15 minutes in length, and edited in GarageBand, or iMovieHD, and again, put together with iWeb.
Periods 4 & 6 - Graphic Arts
  • Students will do three different assignments using mainly Photoshop, but also Illustrator and Painter. They will bring their own personal images, or what will be provided by me for "Photo Painting", which will be followed by "Photo Repair & Restoration", and finally "Trace Drawing, and Colorize".
  • Students will bring in their personal images, organize and label them in iPhoto and create an album, book, and a planned slideshow. Then they will import those images into iMovieHD and create a "Ken Burns" presentation for DVD or VHS.
  • Students will pair up and do a Keynote presentation on their favorite style/genre of art of any medium, with a few names and/or mini-profiles of artists of that style.
These projects should take us to the end of the semester with plenty of work to do, and then some. Remember, classes do your work diligently, and Fridays, minimum days, etc. will become fun days.

Monday, April 17, 2006

Make Up Work

Super Bowl write up
Find a Super Bowl commercial on the internet via Google, and write a paragraph (3 to 5 sentences) on whether or not that commercial influenced you to buy that product. Also, determine whether or not that commercial was even about that product.

MySpace write up
Find an article on any reputable news site about the the controversial online community myspace.com. Write a paragraph summary about the article, leave a web link to the article, and comment if you yourself, or have ever known someone to have been stalked by somebody they met through MySpace. Also, do you leave any personally identifiable information on your profile, i.e. "where you hang out", "what school you got to", not just address or phone number.

E-Locker from Home or Library
From anywhere on campus, or from home take a screen shot of your desktop and upload it to your E-locker. Then download it here and show me. Remember, press the PrintScreen button (sometimes abbreviated as "PrtScr") and paste in MS Word, or MS Paint, save, then upload your account at http://locker.pusd.org . You can also check this previous post.

iLife'06 & iWork'06 Essay
Write an 8 paragraph essay summarizing:
  • iTunes
  • GarageBand
  • iPhoto
  • iMovie HD
  • iDVD
  • iWeb
  • Keynote
  • Pages
Just remember, at the end of each paragraph, include a sentence stating an equivalent Windows program for the same purpose as those mentioned in the list.

Practice Logos
The tutorials for the practice logos may be found at:
http://www.bertmonroy.com/tutorials/text/25_metalLogo.htm
http://www.swedesignz.com/photoshop/logo
http://biorust.com/index.php?page=tutorial_detail&tutid=28
http://www.biorust.com/index.php?page=tutorial_detail&tutid=19
There are few exceptions to their instructions, so use common sense and ask me, when applying them to your Sparkles Logo & 3 Squares Logo. Remember both of these Logos count as one grade.

Recruitment Committee Logo
Refer to the previous post for their mission statement. Remember the deadline has already past for this project, but turn it in for partial credit.

Remember your grades can be viewed on campus at this site:
Rojos Server

Tuesday, March 28, 2006

The Recruitment Committee

This is their mission statement. Use it to inspire you to create the business-style logo.

"The Recruitment Committe is committed to affirm the provision of equal opportunities and equity for under represented populations (people of color and women) for employment and advancement within the City of Pomona."

Friday, February 10, 2006

Weekend Assignment

Make a screenshot and drop it in your Student E-Locker.
  1. Minimize all windows
  2. Then press the Print Screen [Prt Scrn] button on the keyboard
  3. Open the Paint program on all versions of Windows
  4. Go to the edit menu and "paste" the screen shot into Paint
  5. Using the text tool, type [your name]'s screenshot
  6. Upload it to your E-Locker
  7. Show me on Monday

Tuesday, January 31, 2006

Final Grades Posted

Monday, December 19, 2005

Graphic Students

Last Week: Okay, you guys already know what you need to do, but one thing. ComicLife is a demo version, so when you use it, you have to print when you finish compiling, or it won't save your file unless you pay for it and put in the serial number (by the way we have bought it already, but may not see the serial numbers 'til next semester). So here is the workaround:

When ready to print, just go File > Print and in the lower left-hand corner of the print dialog box, choose "save to PDF". This will ensure your final product, and as you will later learn how you are going to submit your project for grading. More later...

Sunday, December 18, 2005

Web Students

Last Week: I want you to generate 3 more pages by the end of this week. You are going to create a new theme, or regenerate the one you had if you overwrote it in our experiments. Then, based on that theme, you are going to make a simple photo gallery, with the appropriate pics of your choice. A favorite links page which will contain all the appropriate sites you normally like to visit. Lastly, a short biographical page which will contain your brief background.

The examples follow:
  • Login, pick a template, and run through the steps of generating one.


  • View template in your browser, and copy URL address


  • Then in NVU, (if buggy, quit and relaunch) Go to File > Open Web Location..


  • Then, open the page you generated in Geocties by pasting the URL address from the browser, and then SAVE it to a NEW folder titled "template" within your web page project folder. IMPORTANT: all the images and javascript files will save as well, so make sure you save to its own folder to avoid clutter.


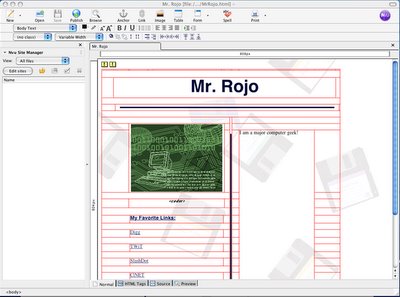
  • Your template should look like this in NVU. The red lines represent a table with cells your content is encapsulated in. Basically it gridlock's your text and photos from auto-wrapping if your web site viewer resizes the browser window. You may delete some cells to make the other pages, however if you delete the table, you may get unexpected results.

Wednesday, December 14, 2005

Comic Strip Project Reminder

Remember:
  1. You must first do a storyboard in NeoOffice with your pictures and dialogue/captions all planned out. Place it in a simple list order.
  2. Then make sure all your photos are in your Comic Strip Project folder, and that you are aware that you need to have 3 sets of files. First the original JPGs, then the XCF GimpShop files for editing, then the newly exported JPGs for importing to ComicLife.
  3. Import them into ComicLife all treated with the Comic Pop-Art tutorial we all went through. Copy and paste your dialogue and captions.

Thursday, December 08, 2005

Converting Photos to Comic Art


  1. Tone: First open up the photo by going to the Gimp toolbar palette, and selecting File > Open and navigate to your folder where your JPEGs are. Then immediately "save a copy as" a GimpShop *.xcf, the native file format for Gimp. After you've saved it to your folder, begin the treatment by duplicating the background layer, and from that layer going to Image > Adjustments > Posterize and choose 6. Then go to Filter > Enhance > Unsharp Mask and apply these settings: Radius 100.0, Amount 1.75, and Threshold 150.
  2. Color: Duplicate the Background layer again, and drag it to the top of the layer set in the palette. Next, go to Filter > Sharpen > Dilate. Then, go to Image > Adjustments > Hue-Saturation... and select. Leave the Hue at 0, set the Lightness to 50, the Saturation to 80, and click OK. Set it's blending mode to "Color"
  3. Ink: Again, duplicate the Background layer another time, move it to the top and go to Filter > Artistic > Cartoon and apply 20.00 for the Mask radius & 0.150 for the Percent Black. Next, go to Image > Adjustments > Threshold and set the left slider to 75, and click OK. Then, go to Filter > Artistic > Photocopy and apply these settings. Mask Radius: 50.00, Sharpness: 0.700, Percent black: 0.750, Percent white: 0.200 . Set the blending mode to "Multiply".
  4. Dot Screen: Create a new blank layer below Ink and label it Dot Screen. Doubble-click the foreground color palette, and change the RGB values to 128, 128, and 128. Then go Edit > Fill with FG Color and it should fill the layer with 50% gray. The go to Filter > Distort > Newsprint and change only, the cell size to 4, and click OK. Now change the Blending Mode to Overlay.
  5. Optional Tweaks: Now that you have done this tutorial in its entirety, you can optionally paint on color to make sure that parts, like eyes and teeth are white, by creating a blank "White" layer above the Tone layer, and a "Painted Color" layer above the original Color layer, to make sure and see if any other colors need touching up.
  6. Saving: Save and Export the file in two different formats. One (if you have not already done so) the *.xcf native GimpShop format for further editing and tweaking, and one as a *.jpg for importing into ComicLife.

Saturday, November 26, 2005

New Rules

Students,
after reviewing the PhotoMosaic projects and observing the how the experiecne went, I have decided to change a few things.
  1. From now on, we will learn to pay attention in the first half of the time span of the project. I will demonstrate on the projector, and you will follow along, asking any and as many questions as you can. This is so you can learn all the features and quirks on the program neccessary to get the "software learning curve" part of it, out of the way, and on to concentrating on the artistic part of the creative experience.
  2. NO PROCRASTINATION. Doing so, will cause me to disable all internet and game access. I do this so you are not rushing at the end, and frustrating me with questions you should have asked in the beginning.
  3. From now on, if you do start the project too late, and your questions are taking too much of my time from the rest of the class, I will refer you to another student who's paid attention and has already done the project, or Google to figure out how to complete the project.
  4. After a project due date has passed, and you have given up, because you are lost, because you decided to wait until the last minute, or you stopped asking for help, because everybody else was competing for help, again, because they waited 'til the last minute, you have the option to write a 3-page double-spaced 12pt. font-sized research paper on the podcast of my choice (mostlikely on Photoshop/Mac or something).
At this point in the semester we have only 4 weeks before Christmas vacation (minus 2 days) and after which, only 3 weeks left in the semester (minus a day). In that first block of time, I want the Graphics students (per. 1-3) to do the Comic Strip project. This project will have one or two quizzes to test your knowlege along the way. The Web students (per. 4 & 6) will begin their personal sites, also with quizzes along the way.

In the second block of time after vaction we will finish up the semester with one more project for the Graphics students, and adding more content to the site for the Web students. So your opportunities to bring up your grade are minimal. So please, lets focus and round out the semester, striving for productivity.

Friday, November 18, 2005

It's All About Me!! [PhotoMosaic Me Project Example]


My mosaic contains:
  • my music
  • favorite foods
  • etc.

Tuesday, November 08, 2005

Official PhotoMosaic Project

Your Assignment:
  • Bring in a photo of yourself (either digital or print)
  • Scan it (if it's a print) at 300 DPI for a final print of 8.5 x 11 "
  • It should be "landscape" style (sideways)
  • Create a PhotoMosaic of yourself that will include pictures of: friends, family, hobbies, favorite foods, sports you play, games you like, etc.
  • Every tile must be applicabale, NO RANDOM, OR INNAPROPRIATE PICS
Due November 18, on Friday

Friday, October 28, 2005

iPhoto & Files Extensions Quiz today

Good news students. I have found an excellent online quiz solution for us. This will challenge and build your knowlege of important skills and facts about iPhoto and file extensions.

Everybody needs to bring up 3 tabs in Safari or Firefox.

--In the first tab you will launch this site: Rojo's Server and retreive your username,
and use your student ID # as a password


--In the second tab, you will go this site: QuizStar
and login using the info from the PDF

--In the third tab is where you will do all your web research, for this is an "open computer"
test.

Remember, although you could find any answer you will need for the quiz, on the web, I want you to try to answer as many as you can based on what I have taught you. Remember, absolutely NO talking. Quizzes can only be taken once, so make it count. Once you submit your final answers, that's it, there is no "back button"

Wednesday, October 19, 2005

Create Slideshow Due Friday

Your assignment is to generate a slideshow in iPhoto with 5 duplicate pictures, or in other words 10 "before and after" pics. These pictures will display a before and after example to show that you have used each tool (except Red Eye reducer). These will include:
  • Enhance
  • Retouch
  • B&W
  • Sepia
  • Adjust Levels
Once your slideshow has all the photos, you will add a dramatic transition, i.e. either a block or flip transition, etc. between each pic. You will also add either music from iTunes, or the generic melodies.

The web class can also choose to generate a web page instead, but the main idea is this project for both classes is to learn treatment and preparation of photos for presentation.

Photos with wild contrast or colorization will not be accepted.

Due This Friday, October 21, 2005

Rojo's Web Server

I am testing this web server to see if it can handle all 30 students requesting pages. This will also be the place where you will take quizzes.

NOTE: This link will only work on campus.

Local Address:
Rojo's Server

Tuesday, October 04, 2005

This is the Code you need to copy and paste for a link to my Blog:


<mainorarchivepage>
<h2 class="sidebar-title">Links</h2>
<ul>
<li><a href="http://rojosclass.blogspot.com/">Mr. Rojo's Blog</a></li>
<li><a href="http://help.blogger.com/bin/answer.py?answer=110">Edit-Me</a></li>
</ul>
</mainorarchivepage>

Welcome Ganesha Students!

This will be the location where you will retreive projects, assignments, etc.